Wednesday, October 31, 2012
Thai Shrimp Soup
Last night we got a little creative.
Thai Shrimp Curry. But I decided to make it into a soup, because it's a lot easier for me to blend later. I like things with a lot of flavor. Good thing about this soup is that you pour it over a bed of rice, so it's a perfect dinner for everyone.
First, start a batch of white rice in your rice cooker. Then in a deep pot, bring 3 cups of chicken stock and 2 cups of water to a boil.
Add the following spices:
1/2 tsp chili powder
1 tsp curry powder
1/2 tsp smoked paprika
1/2 tsp cayenne pepper
1/2 tsp basil leaves
Then add the following veggies:
1 chopped carrot
1 peeled, chopped Mexican squash
1 cup shitaki mushrooms
1/2 chopped sweet onion
1/2 can baby corn
Let that all simmer while you clean your shrimp. We used half a frozen bag of unshelled and uncooked shrimp. After they were cleaned, we added them to the soup.
Lastly, while everything was cooking, we added half a can of coconut milk and some fresh cilantro leaves.
Let the soup boil until the shrimp are fully cooked. Then, pour over a bed of rice and enjoy!
Sunday, October 28, 2012
Mmm Mmm Cornbread
I loooooove cornbread. Especially with melted butter and honey. It's also fabulous under a heaping pile of chili with sour cream and cheese. This is a recipe I have perfected over the years, and it is wonderful.
1/2 cup room temp butter
2/3 cups sugar
2 eggs
1 cup milk
1 tbsp vinegar
1/2 tsp baking soda
1 cup corn meal
1 1/4 cup flour
pinch of salt
First, combine the milk and vinegar, then set it aside.
Cream the butter and sugar.
Mix in the eggs.
Add the baking soda to the milk, and let froth.
Mix in the corn meal and 1/2 cup flour.
Mix in the milk.
Add the rest of the flour and salt, and beat well.
Pour into a greased 9x9 pan, and bake in a preheated 375 oven for about 30-40 or so minutes, until the top is golden brown and a toothpick comes out clean.
Ahhhh, isn't it just delightful? I made some this morning and my whole house smells warm and cozy. Like an afternoon at grandma's or something.
Thursday, October 25, 2012
Spinach Ravioli
Yeah, I think I have been watching the food network a little too much. I thought it would be fun to try and make my own ravioli from scratch.
So, Nick and I took a stab at it. We found a recipe for pasta dough, and then just fudged over a filling.
Pasta:
3+ cups flour
3 eggs
3/8 cup water
1/2 tsbp oil
Filling:
2 cups cooked spinach
1 tbsp butter
1 cup shredded mozzarella cheese
4 tbsp parmesan cheese
onion powder, parsley, cilantro, garlic powder
Whip the eggs, then add the oil and water. Gradually add the flour and knead until elastic, adding flour as needed. Then let it rest.
Mix the cooked spinach, cheeses, butter and spices together. It will be nice and sticky, but form well.
Roll out the pasta dough very thin, then cut with a pizza cutter into little rectangles. Place a small amount of the spinach filling onto each piece, then fold the dough over onto itself, forming little pillows. Seal the edges with a little water.
Cook raviolis in boiling oiled water for about 2-3 minutes. Be careful not to over cook or they will get rubbery.
Enjoy with some tomato or alfredo sauce!
Nick and I had a lot of fun making these, they are pretty easy and a good way to get the whole family involved in meal preparation. Besides, it's satisfying to make things from scratch!
Tomato Man'n'cheese
I don't have a picture, because I doubt my husband would ever eat what I am about to blog. It's mac'n'cheese…..with tomatoes.
Yeah, most people usually add chili or hotdogs to their cheesy pasta, right? Well, one way my mom always used to make for me growing up was with Italian stewed tomatoes. I know it sounds strange, but trust me when I tell you, it's really good. When I was little, I never liked macaroni and cheese, even the character shaped ones. One thing I did love was to eat tomatoes, right out of the can. It was a favorite snack of mine. It's ok, you can laugh, I was a weird kid.
Mom told me mac'n'cheese with tomatoes was an old New England comfort dish, but I secretly wonder if it was her way of getting me to eat it. Haha, whatever the reason, it's super tasty and I highly recommend you try it. And it's easy.
Prepare one box of macaroni and cheese (whatever brand is your favorite). Then, add a can of Italian stewed tomatoes.
Or, if you want to get really fancy, try this out instead.
Boil elbow noodles till al dente.
Grate medium cheddar, monterey jack, mozzarella and American cheese. You should end up with about 3 cups of cheese.
Melt with 4 tbsp butter and 4 tbsp cream. (If you like it to have more flavor, you can add onion powder, garlic powder, or mustard powder.) It should be nice and creamy thick.
Add 1 can of Italian stewed tomatoes and stir till well mixed.
In a greased pan, add the noodles, then pour the cheese sauce over evenly.
Top with more grated cheese, then bake in a preheated oven at 350 until the top looks golden and bubbly. Slightly burnt is yummy too.
For an added crunch, you can garnish with seasoned or unseasoned bread crumbs. Crackers tend to make it waaaaaay too salty.
Use salt and pepper to taste.
Go on, be adventurous!
Tuesday, October 23, 2012
Sausage Soup
At a family dinner we had a few weeks ago, my sister in law made a tortellini soup. I didn't get to try any, but my son Tristan sure enjoyed it. So I thought I would try and make my own version. We went to the store to pick up the ingredients I wanted, but discovered the tortellinis were super expensive. Eight bucks for a bag! Sooooo, I thought I would get creative. I bought a box of whole grain pasta instead.
Here is what I ended up using.
1/3 box of spiral whole grain pasta
Half a pound of hot Italian sausage
1 can Italian stewed tomatoes
1 zucchini chopped
1/2 sweet onion chopped
1/2 cup button mushrooms
2 1/2 tbsp sugar
salt, garlic powder, oregano, parmesan cheese (to taste)
3-5 cups beef broth (depending on how soupy you want it)
2 tbsp olive oil
Fairly simple and straight forward right?
First, cook and drain the pasta. Set that aside
Brown the sausage until thoroughly cooked in a frying pan, then add the tomatoes, onion and zucchini, and mushrooms. Add the sugar. Cook until the vegetables are tender. In a large pot, add the broth, oil, spices and pasta. Then stir in the sausage and veggies. Cook for about 15-20 minutes on medium heat, just enough for all the flavors to meld, but not too long that you turn your pasta into goop.
Garnish with parmesan cheese and serve with a side of garlic toast.
Wow, can I say that turned out fabulously? It was so stinkin tasty I couldn't believe it. Even after I blended it, it was still perfectly sweet and spicy. Nick had a huge bowl for dinner, and then another for lunch the next day. It's a great dish for a cold fall day, give it a try! (Thanks Andrea for the inspiration!)
Thursday, October 18, 2012
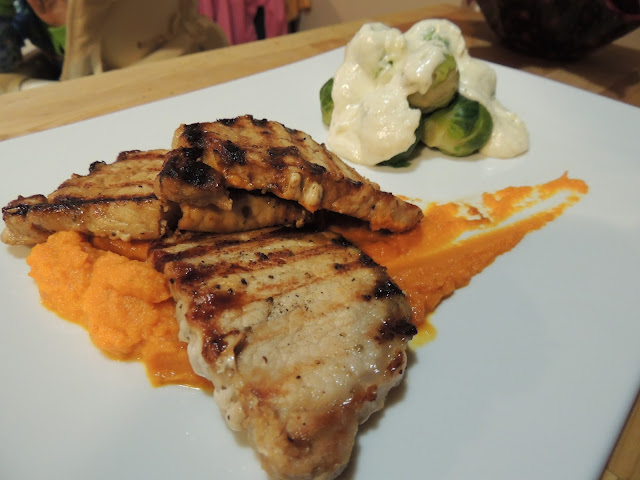
This one is pretty straight forward. It's pork chops over a carrot pumpkin puree with brussels sprouts and nutmeg cream sauce. Let's just say I have been watching a little too much chopped.
The pork chops I marinated in the maple glaze and then grilled.
Basically for the puree, just boil carrots and then blend together with a few table spoons of canned pumpkin. Be sure to add lots of brown sugar and butter, as well as nutmeg and cinnamon to taste.
For the garlic sauce, saute butter until melted, then add flour to make a sauce base. Once the flour is cooked, add heavy whipping cream and whisk well. Add a little lemon juice, garlic, pepper, salt, nutmeg, whisking until nice and thick. That goes over the boiled or steamed brussels sprouts.
It was so tasty, even Tristan enjoyed it all! The best thing though, remember to experiment, that's more fun than just following a recipe; you may find a taste you like better! For instance, I bet a sweet potato puree would be fabulous as well!
Saturday, October 13, 2012
Molasses Cookies
Growing up, my favorite dessert my mom would make for us was molasses cookies. But hers weren't like the normal kind you get in the store. They were almost muffiny, like pumpkin cookies. They were very soft and pillowy, but very very rich and flavorful. I always loved when she pulled them out of the oven and they looked like little hills. Sometimes she would ice them with cream cheese frosting, and that was divine.
It was because of her I developed a great fondess for molasses and have been searching to find a recipe that was just as good.
And here is what I have compiled over the years. I baked about 5 dozen for a family dinner party tonight, and they were all consumed.
Technically, they are ginger cookies, but I just don't add as much ginger and change up the spices I use to make it my own. But they are super soft and moist and oh so delicious.
And the bests part, you roll them in sugar before you bake them, how can you beat that?
So, here is the recipe:
2 1/4 (+) cups flour
1 tsp soda
pinch of salt
1 tsp cinnamon
1/4 tsp ginger
1 tsp cloves
3/4 cups butter
1 cup sugar
1 egg
1/4 cup molasses
dash of vanilla
Sugar
Cream the butter and sugar, then beat in the egg. Add the vanilla and molasses, mix well. Sift together all the dry ingredients, and them mix into the wet. The dough will be sticky, but should form into balls well enough. Drop balls in sugar and roll till well coated. Place on parchment paper lined baking tray and back for about 10 minutes, until the tops look cracked.
Eat them as soon as they are cool enough for you to stand! They are fabulous, so so tender and sweet, I can't get over it. I think I will go have one right now, actually!
Tuesday, October 2, 2012
Notice a theme?
Fall means pumpkin time. How can I resist when I go to the store and see a lovely box full to the top with beautiful mini pumpkins? When I brought it home, Nick thought I was going to be making a soup. Nope, I decided I was going to try and make, for the very first time in my life, a pumpkin pie.
What, you ask? How have I gone 25 years without having ever made a single pumpkin pie? The answer is simple. Costco. And Sam's Club. They make fabulous pies for super cheap.
But, now that I have my own family, and I am a compulsive baker, I just had to give it a try.
So going through a few recipes, I decided how best to make my own. I wanted it to be creamy and light, so I thought I would use cream cheese. But I also wanted it to be like an actual pie, so I bought a can of sweetened condensed milk. It helps with the gelatinousness. And here is what I ended up doing.
I seeded and baked a little sugar pumpkin (or pie pumpkin, whatever you call it) for an hour and a half. Then I mashed it and let it cool down.
While the guts were cooling, I started on the pie crust, it's one I've also perfected.
2 cups flour
1/2 cup butter
1/2 cup ice water
2 tbsp sugar
Cut the butter into the flour and sugar. Add ice water until a stiff dough forms, then put it back in the fridge.
Now, for the filling.
1 sugar pumpkin, cooked and mashed
1 can sweetened condensed milk (about 1 1/3 cups)
1 half brick of cream cheese
2 eggs
3 tbsp sugar
lots and lots of pumpkin pie spice (sorry, I never measure, I just add enough until it smells strong)
Beat the cream cheese until it is smooth, then add the eggs. Add the mashed pumpkin and mix well. Pour in the milk and sugar and spice, then mix for a few minutes until it is very smooth. Set it aside.
Take your pie crust out of fridge, flour it well, and roll it onto a floured surface. Roll out until you are able to drape it into an oiled pie pan, and then cut off the excess. Using your thumbs, pinch down the sides to give a rippled affect. Then pour in your filling!
Bake at 325-350 for about 30-45 minutes. At least I think……haha, sorry, my son was being a little crazy. Just watch it well, and when it seems firm but jiggles a little like jello, it's ready to be taken out. Let it cool down completely before you serve it so it has time to set.
When I was taking my picture, I asked Nick to come take a look. He was like eww, so I told him to take a bite. He did, then grabbed the whole piece off the plate and left. A few minutes later, through a full mouth, he told me it was excellent.
Well, guess I did pretty good for my first try!
Monday, October 1, 2012
Sushi Secret
Ever wonder how they get the perfect tang and stickiness to the rice in Sushi rolls? Vinegar! Who knew right?
I'll tell you how to get it just right anyways. In a perfect world, we would all steam our rice in giant wooden steamers. For most of us though, little dinky rice cookers from Walmart have to do. Once the rice has steamed, take it out and put it in a bowl. Mix together rice vinegar, sugar and salt (we did 1/4 cup vinegar, 1 tbsp sugar, 1 tsp salt) and then pour it over the rice. Stir until it's all incorporated, and you will be amazed at how well it sticks together. And the flavor is just like in a Japanese Sushi bar.
Our first few attempts at homemade Sushi did not turn out very well. We used cocktail shrimp for one, and canned tuna for another. I don't think either of us are brave enough to put raw fish on the rice, just because you know, if you don't prepare things that are raw just right they can get you pretty dang sick. I mean, I'm just making that assumption.
Tonight worked out way better, the tip from Bobby Flay's throwdown challenge was a good one. We ended up putting imitation crab and cream cheese on the perfect little rice balls. (Don't worry, I didn't blend any, I'm not that disgusting). But Nick said it tasted great. He loved the rice best, and said it was perfectly prepared. Dipped in a little soy and wasabi, it made a great little dinner.
I was so proud of myself for finally making the perfect Sushi rice, I thought I would share it! So if you've got a Sushi making kit, go ahead and try it out! (Or laugh at me and say, silly Sara, that's a well known fact of Sushi making!!!)
Subscribe to:
Posts (Atom)